jQuery Blox

Una nueva manera de mostrar más información / A new way to show more info
Selecciona tu idioma / Select your language:⌗
ES
Con jQuery Blox puedes desplegar información de una manera diferente, y con una fácil y rápida configuración. Basta con que armes tu HTML siguiendo un simple patrón de bloques, y definirle al plugin los nombres de los elementos que estás construyendo (o mantener los pre-configurados); Blox se encarga de crear una mayor interacción de tu información hacia el usuario.
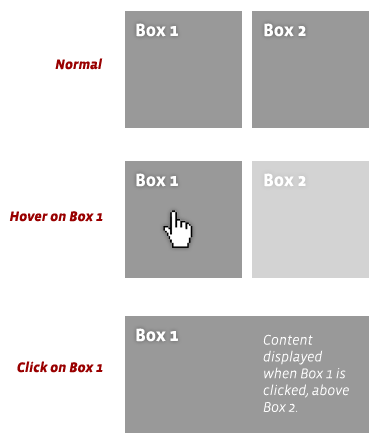
Blox ofrece 3 estados:
- Normal: cuando el usuario no interviene con la caja HTML que contiene los bloques.
- Hover: cuando el mouse está sobre alguna de las cajas, por defecto Blox hace las otras semi-transparentes.
- Click: cuando se hace click a alguna caja, ésta se amplía animándose hasta cubrir el total de la caja contenedora por sobre las demás y muestra la información anexa a esa caja.
El uso de Blox no debería limitar la creatividad de quien la vaya a usar, pero es necesario conocer y mantener ciertas reglas para su correcto y total funcionamiento, principalmente de estructura HTML y de estilos CSS:
Estructura HTML
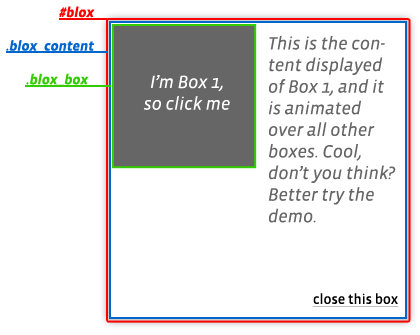
Primero necesitas una caja que contenga las demás cajas; por defecto Blox la define con el id blox. Esta caja contenedora #blox es la que soportará a las demás cajas, las que Blox denomina por defecto con una class blox_content. Esta caja .blox_content es la que tiene 2 importantes funciones: soporta al contenido que estará oculto en el primer estado, y a una tercera caja llamada .blox_box que es la gatillante de toda la interacción de Blox.
El HTML básicamente debe ser como la siguiente estructura:
<div id="blox"> <span class="commenthtml">/* un contenedor */</span><br />
   <div class="blox_content" id="box_1"> <span class="commenthtml">/* varias cajas de contenido */</span><br />
       <div class="blox_box"> <span class="commenthtml">/* caja que soporta el click */</span><br />
          Box 1<br />
       </div><br />
       Contenido desplegado cuando Box 1 es clickeado.<a href="#" class="blox_close">Cerrar Bloque</a> <span class="commenthtml">/* contenido oculto pero que se muestra al click en la caja anterior */</span><br />
   </div><br />
   <span class="commenthtml">/* otras cajas con el mismo patron */</span><br />
</div>
Estilo CSS
La magia está en el uso de posición absoluta para que las cajas se muevan con libertad y fluidez. Para que las cajas se comporten así, deben tener un estilo específico. La que contiene a todas las cajas, #blox, debe tener un alto fijo, un ancho fijo y posición relativa ya que será quien soporte a las cajas menores .blox_content, las que tienen posición absoluta, alto fijo y ancho fijo. Cada una de las cajas .blox_content, deberían tener ubicaciones diferentes mediante id único, respecto a #blox utilizando las propiedades left y top.
La tercera caja .blox_box también debería tener un ancho y alto fijo, seguramente el mismo que su caja padre .blox_content, y para el resto de los elementos tienes libertad total de hacer lo que quieras con su estilo.
Finalmente, el CSS básico es el siguiente:
#blox {<br />
   width: 400px;<br />
   height: 400px; <br />
   position: relative;<br />
}<br />
   .blox_content {<br />
      width: 200px;<br />
      height: 400px; <br />
      position: absolute;<br />
   }<br />
      #box_1 {<br />
         top: 0; <br />
         left: 0;<br />
      }<br />
      #box_2 {<br />
         top: 0; <br />
         left: 200px;<br />
      }<br />
      <span class="commentcss">/* asi con cada una de las otras cajas */</span><br />
   .blox_box {<br />
      width: 200px; <br />
      height: 400px; <br />
   }
Configuración
Por defecto Blox viene pre-configurado de fábrica, y su programación permite que alteres los siguientes parámetros:
- container: id de la caja contenedora, por defecto #blox
- content: class de las cajas con contenido, por defecto .blox_content
- box: class de la caja que inicia la secuencia para mostrar el contenido, por defecto .blox_box
- close: class del link o botón que cierra caja caja desplegada, por defecto .blox_close
- transparency: [yes/no]¿requieres transparencia? por defecto yes
- fadein: nivel de transparencia (de 0 a1) de las cajas al mouseover, por defecto 0.2
- fadeout: nivel de transparencia (de 0 a1) de las cajas al mouseout, por defecto 1
- animation: [yes/no]¿requieres animación? por defecto yes
- timein: tiempo en ms en que cada caja se demora en abrir, por defecto 100
- timeout: tiempo en ms en que cada caja se demora en cerrar, por defecto 200
- direction: [lefty/righty] hacia donde se abrirá cada caja, por defecto a la izquierda lefty
Para utilizarlo con estos valores por defecto, sólo debes seguir 2 pasos básicos:
-
Agregar tu librería de jQuery favorita y este humilde plugin:
<script src="jquery-1.3.1.min.js" type="text/javascript"></script><br />
<script src="jqueryblox-v0.9.js" type="text/javascript"></script>
<li>
Activarlo: <pre class="language-markup"><code><script type="text/javascript"><br />
$(function(){<br />
$().blox();<br />
});<br />
</script>
Si quieres configurarlo según tus necesidades, basta ir modificando los parámetros como te sean necesarios:
<script type="text/javascript"><br />
     $(function(){<br />
         $().blox({<br />
             container: '#contenedor_blox',<br />
             close: '.boton_cierra',<br />
             direction: 'righty',<br />
             fadein: 0.6<br />
         });<br />
     });<br />
</script>EN
With jQuery Blox you can display information on a whole new way with a quick and easy setup. Just write yout HTML in a simple block pattern, and tell the plugin your element names (or maintain the pre-configured ones); Blox will display your information with a new interaction for your user.
Blox offers 3 states:
- Normal: when the user does not interfere with the box containing the HTML blocks.
- Hover: when the mouse is over one of the boxes, by default Blox makes the others semi-transparent.
- Click: when you click on any box, it will animate its expansion to cover the total of the container above all other blocks, to show the information attached to that block.
Using Blox should not limit the creativity of who will use it, but it needs to maintain certain rules for their correct and full operation, mainly HTML strucuture and CSS styles:
HTML Structure
First you’ll need a box containing all other boxes, by default Blox calls it with the id blox. This container #blox will support all the blocks which Blox names with the class box_content. This block .box_content have 2 major functions: support the content hidden in the first state, and contains a third block called with the class .blox_box which is the one that fires the Blox interaction, expanding and moving the boxes to display the hidden information.
The HTML should be basically as follows:
<div id="blox"> <span class="commenthtml">/* a container */</span><br />
   <div class="blox_content" id="box_1"> <span class="commenthtml">/* many content blocks */</span><br />
      <div class="blox_box"> <span class="commenthtml">/* box that fires the interaction */</span><br />
         Box 1<br />
      </div><br />
      Content displayed when Box 1 is clicked, above Box 2.<a href="#" class="blox_close">Close Box</a> <span class="commenthtml">/* hidden content displayed at .blox_box click */</span><br />
   </div><br />
   <span class="commenthtml">/* other boxes with the same pattern */</span><br />
</div>
CSS Style
The magic is in the use of absolutely positioned blocks to move them freely and smoothly For the blocks to behave like we want, they must have a specific style. The box that contains all other blocks #blox must have fixed height and width and relative position to support the smaller boxes named .blox_content which must have fixed height and width as well but absolute positioned. Each one of this boxes .blox_content should have different placements, givven through an unique #id using the properties left and top.
The third box .blox_box should also have a fixed width and height, probably the same as its parent .blox_content. For the rest of the elements you have total freedom to do whatever you want with their style.
Finally, the basic CSS is as follows:
#blox {<br />
   width: 400px;<br />
   height: 400px; <br />
   position: relative;<br />
}<br />
   .blox_content {<br />
      width: 200px;<br />
      height: 400px; <br />
      position: absolute;<br />
    }<br />
       #box_1 {<br />
          top: 0; <br />
          left: 0;<br />
       }<br />
       #box_2 {<br />
          top: 0; <br />
          left: 200px;<br />
       }<br />
      <span class="commentcss">/* like this for each of other boxes */</span><br />
      .blox_box {<br />
         width: 200px; <br />
         height: 400px; <br />
      }
Configuration
By default, Blox comes preconfigured from the factory, and its programming allows you to alter the following parameters:
- container: container box id, default to #blox
- content: class of each content box, default to .blox_content
- box: class of the box that fires the content display, default to .blox_box
- close: class for the link (button) that closes the content box, default to .blox_close
- transparency: [yes/no] do you want transparency on hover? default to yes
- fadein: transparency level (from 0 to 1) when you mouseover a box, default to 0.2
- fadeout: transparency level (from 0 to 1) when you mouseout a box, default to 1
- animation: [yes/no] do you want the boxes to animate? default to yes
- timein: time in ms that each box takes to display the content, default to 100
- timeout: time in ms that each box takes to hide the content, default to 200
- direction: [lefty/righty] which direction each box is opened, default to left lefty
To use it with the default values, just follow this 2 simple steps:
-
Add your favorite jQuery library and this humble plugin:
<script src="jquery-1.3.1.min.js" type="text/javascript"></script><br />
<script src="jqueryblox-v0.9.js" type="text/javascript"></script>
<li>
Activate it: <pre class="language-markup"><code><script type="text/javascript"><br />
$(function(){<br />
$().blox();<br />
});<br />
</script>
If you want to customize it to suit your needs, just change the necessary parameters:
 <script type="text/javascript"><br />
     $(function(){<br />
         $().blox({<br />
             container: '#my_boxes,<br />
             close: '.closeboxes,<br />
             direction: 'righty',<br />
             fadein: 0.6<br />
         });<br />
     });<br />
</script>Baja el plugin / Get the plugin⌗
[Bajar/Download plugin (.zip 1kb)][1]{.bajar}
[Bajar/Download plugin+demos (.zip 220kb)][2]{.bajar}
Blox logo by youfeelme.biz
[1]: http://www.csslab.cl/downloads/jQuery+Blox “Enlace en CSSLab a “Bajar/Download plugin”” [2]: http://www.csslab.cl/ejemplos/blox/jQueryBlox.0.9+demos.zip “Enlace en CSSLab a “Bajar/Download plugin+demos””